How to install Metamod
How to Install Metamod for Your HLDS Server
Welcome to this comprehensive tutorial on how to install Metamod for a GoldSRC server running Half-Life (including mods such as Valve, Team Fortress Classic, Counter-Strike, Day of Defeat, and Natural Selection). For those unfamiliar, Metamod is a dynamic plugin/DLL manager that acts as an intermediary between the Half-Life Engine and an HL game mod. It allows the seamless loading and unloading of mod-like DLL plugins, enabling additional functionality for your HL server or game mod.
In this guide, we will be using the original Metamod v1.20. However, alternative versions of Metamod are available, which I will list below. This tutorial is based on a fresh installation of HLDS created via SteamCMD on Windows. The installation process for Linux is similar, with differences highlighted as we proceed. For this example, Metamod will be installed into the valve folder. If you are using a mod such as Counter-Strike, install it into the cstrike folder. Similarly, use tfc for Team Fortress Classic, ns for Natural Selection, dod for Day of Defeat, and gearbox for Opposing Force.
- Metamod v1.20: The original Metamod release.
- Metamod P: An updated version by Jussi Kivilinna ([DRS]Hullu), offering improved performance, reduced CPU usage, and autodetection for unknown mods. Recommended for most users.
- Metamod R: Designed for use with ReHLDS servers.
Begin by downloading Metamod from the official website.
Once downloaded, navigate to your mod folder (e.g., valve) and create a folder named addons. If the folder already exists, you can use it. Inside addons, create a folder named metamod, and within metamod, create another folder named dlls. Place the downloaded metamod.dll file into the dlls folder. For Linux, the file will typically be named metamod.so or metamod_i386.so. I recommend renaming it to metamod.so, as filenames with _i386 can cause loading issues.
Your folder structure should now look like this:
valve/addons/metamod/dlls/metamod.dll

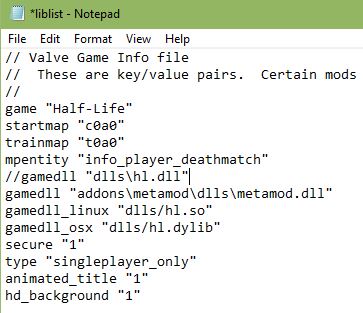
Next, return to the valve folder and locate the file liblist.gam. If you cannot open it directly, right-click and select "Open with" to open it using a text editor such as Notepad.
If you are using Windows, locate the line:
gamedll "dlls\hl.dll"
For Linux, locate:
gamedll_linux "dlls/hl.so"
It’s important to note the difference in file path separators: Windows uses backslashes (\), whereas Linux uses forward slashes (/).
To ensure the original DLL is not loaded, comment out the line by adding two forward slashes (//) at the beginning, like so:
//gamedll "dlls\hl.dll"
Then, add the appropriate line depending on your operating system:
For Windows:
gamedll "addons\metamod\dlls\metamod.dll"
For Linux:
gamedll_linux "addons/metamod/dlls/metamod.so"
Note: Linux file paths are case-sensitive. Ensure all file and folder names are in lowercase to avoid loading errors.

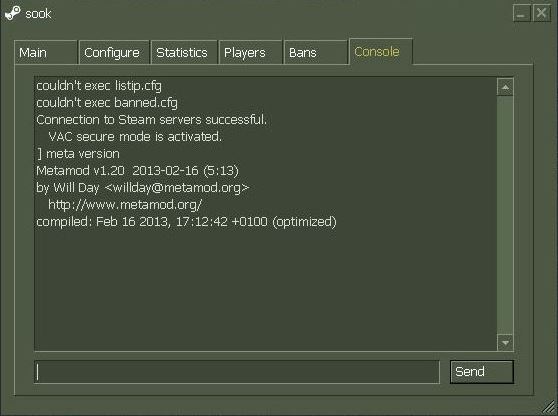
Save and close the liblist.gam file. Launch your server or game to verify the installation. If everything is functioning correctly, the server or game should load without issues. To confirm Metamod is running, open the in-game console and type:
meta version
You should see information about the installed Metamod version, as shown below:

If you encounter any issues, please join our Discord community for assistance. I’ll be happy to help you troubleshoot.


